|
|
|||||
|
|||||
|
QUALITY FEATURE:
O.D. (Outside Diameter) to I.D. (Inside Diameter), I.D. to I.D., & O.D. to face T.I.R. (Total Indicated Run Out.)
FIRST HEADER DIE, INC INSPECTION PROCESS:
Not enough attention is given to this quality feature in the industry. The T.I.R. between body parts in assembled dies is a critical factor and is not monitored in all die making facilities to the degree it needs.
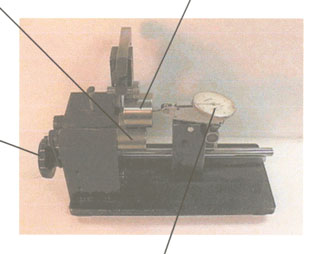
A very accurate way to inspect for run out of one item to another is with a T.I.R. gage as seen below. The part in question is placed in the gage and an indicator is used to check variances between the surface on the rollers of the gage and the surface being indicated. In the picture below, a die insert is being inspected. This method can also be used to check run out between different body diameters with the use of a blank taken from the die and placed on the gage in the same manner as the insert. Also of use is the checking of the face to the O.D. T.I.R. with this gage.
Rollers accurate to .00005.
Part to be inspected. This process will also help in
determining the roundness of the O.D. and the I.D.Drive handle used to
slowly rotate part.Indicator accurate to .00005 to detect any deviation in
the position of the hole as it relates to the O.D.
|
Site design and maintenance by Rockford Web Design
comments and questions about the site: webmaster@rockfordwebdesign.com


